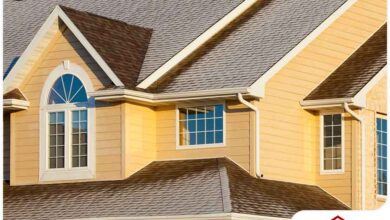
Thinking about boosting your home’s energy efficiency and curb appeal? Learn how to install insulated siding with this comprehensive, step-by-step guide that blends expert tips, safety protocols, and cost-saving insights.


Why Choose Insulated Siding? The Benefits Explained

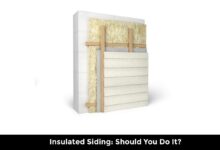
Insulated siding has rapidly become a top choice for homeowners seeking energy efficiency, durability, and aesthetic appeal. Unlike traditional siding, insulated siding integrates a layer of rigid foam insulation directly into the panel, enhancing thermal performance and reducing heating and cooling costs. According to the U.S. Department of Energy, proper insulation can reduce energy bills by up to 20%, making this upgrade both practical and economical source.
Energy Efficiency and Cost Savings
One of the primary reasons homeowners ask, ‘How to install insulated siding?’ is the promise of long-term savings. The integrated foam backing acts as a continuous insulation layer, minimizing thermal bridging—the process where heat escapes through studs and gaps in traditional wall assemblies.
- Reduces air infiltration by up to 30%
- Lowers HVAC system workload
- Improves indoor comfort year-round
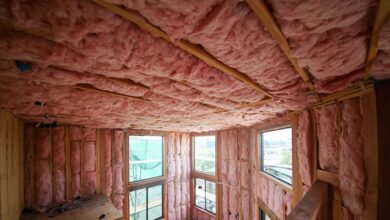
Studies by the National Institute of Standards and Technology (NIST) show that insulated vinyl siding can improve a wall’s R-value by 2.0 to 3.6, depending on the product source. This translates into noticeable reductions in energy consumption, especially in extreme climates.
Enhanced Durability and Weather Resistance
Insulated siding isn’t just about energy—it’s built to last. The foam backing adds structural rigidity, making panels more resistant to impact, warping, and wind damage. This is especially valuable in regions prone to storms or high winds.
- Withstands winds up to 150 mph (depending on manufacturer)
- Resists moisture infiltration when installed correctly
- Less prone to dents and deformation than standard vinyl
“Insulated siding combines the low maintenance of vinyl with the performance of continuous insulation—making it a smart upgrade for modern homes.” — Home Energy Magazine
How to Install Insulated Siding: Tools and Materials Checklist
Before diving into the actual installation, gathering the right tools and materials is critical. Skipping or substituting key items can compromise both safety and performance. Here’s what you’ll need to successfully complete your project on how to install insulated siding.
Essential Tools for Installation
Professional-grade tools ensure precision and efficiency. While some can be rented, investing in quality tools pays off in accuracy and time saved.
- Power drill with screwdriver bits
- Utility knife or tin snips (for cutting foam and metal trim)
- Chalk line and level
- Measuring tape and framing square
- Nail gun or siding fastener tool (compatible with insulated panels)
- Ladder or scaffolding (for multi-story homes)
- Safety gear: gloves, goggles, hard hat
Using a specialized siding cutter or circular saw with a fine-tooth blade helps prevent chipping the vinyl surface during cuts.
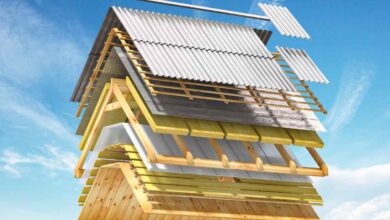
Core Materials and Siding Types
Insulated siding comes in various materials, but vinyl with integrated foam is the most common due to its affordability and ease of installation. Other options include fiber cement with added insulation boards.
- Vinyl insulated siding (most popular)
- Fiber cement with exterior insulation (higher cost, more durable)
- Insulation types: expanded polystyrene (EPS), extruded polystyrene (XPS)
- Required accessories: J-channels, corner posts, starter strips, trim pieces
Always purchase 10–15% extra material to account for waste, cuts, and future repairs. Matching color batches is crucial, so buy all panels from the same lot.
How to Install Insulated Siding: Pre-Installation Preparation
Skipping prep work is the number one cause of failed siding projects. Proper preparation ensures a smooth, long-lasting installation when learning how to install insulated siding.
Inspect and Repair the Existing Wall Surface
Begin by removing old siding if present. Inspect sheathing for rot, mold, or water damage. Replace any compromised plywood or OSB boards.
- Check for soft spots by pressing firmly on walls
- Look for signs of pest infestation (termites, carpenter ants)
- Ensure sheathing is securely fastened to studs
If moisture damage is found, address the source (e.g., leaking gutters, poor drainage) before proceeding. A solid, dry substrate is non-negotiable.
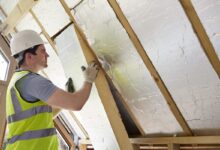
Install Weather-Resistive Barrier (WRB)
Even with insulated siding, a weather-resistive barrier like housewrap is essential. It prevents air and water intrusion while allowing vapor to escape.
How to install insulated siding – How to install insulated siding menjadi aspek penting yang dibahas di sini.
- Use code-compliant housewrap (e.g., Tyvek, Typar)
- Install from bottom to top, overlapping seams by 6 inches
- Seal seams and penetrations with compatible tape
- Integrate with flashing around windows, doors, and roof junctions
According to the Building Science Corporation, improper WRB installation is responsible for over 60% of moisture-related siding failures source. Take your time here—this layer protects your home for decades.
How to Install Insulated Siding: Step-by-Step Installation Guide
Now that prep is complete, it’s time to execute the core process of how to install insulated siding. Follow these steps meticulously for professional results.
Step 1: Install Starter Strip
The starter strip provides a secure base for the first course of siding and ensures a straight, level starting point.
- Measure and mark a level line around the perimeter, 1 inch below where the first panel’s top edge will sit
- Nail the starter strip to this line, leaving a 1/4-inch gap at joints for expansion
- Ensure the strip is taut and level—use a chalk line for long runs
Starter strips are typically sold by the manufacturer and are designed to interlock with the first panel’s nailing hem.
Step 2: Begin with Corner Posts and J-Channels
Install vertical trim pieces before siding to create clean edges and protect corners.
- Measure from starter strip to eave or top of wall
- Cut corner posts with a utility knife or miter saw
- Leave a 1/4-inch gap between sections for thermal expansion
- Fasten every 16–24 inches, ensuring plumb alignment
J-channels are used along window and door openings, soffits, and gable ends. They allow siding to slide in while concealing cut edges.
Step 3: Install First Course of Siding
Begin at the bottom and work upward. The first panel sets the tone for the entire installation.
- Slide the panel’s bottom edge under the starter strip
- Pull the panel down slightly to allow for expansion (do not pull tight)
- Fasten nails at the center of the nailing slots, not the edges
- Space fasteners every 12–16 inches, aligned with wall studs
Nailing too tightly is a common mistake. Panels must be able to expand and contract with temperature changes. A loose fit prevents buckling and warping.
How to Install Insulated Siding: Handling Windows, Doors, and Corners
Windows and doors present unique challenges. Proper flashing and trim installation are critical to prevent leaks and maintain energy efficiency—key concerns when learning how to install insulated siding.
Flashing Around Openings
Water infiltration is the enemy of any siding system. Use integrated flashing or peel-and-stick membranes to create a watertight seal.
- Apply sill flashings under window jambs
- Install head flashings above windows and doors
- Use J-channels to terminate siding at openings
- Overlap housewrap and flashing in a shingle-style fashion (bottom to top)
The American Architectural Manufacturers Association (AAMA) recommends a minimum 2-inch overlap for all flashing joints source.
Cutting and Fitting Panels Around Obstacles
Dryer vents, electrical outlets, and pipes require precise cuts. Measure twice, cut once.
- Use a utility knife for small cutouts (score and snap)
- For larger openings, use a jigsaw with a fine-tooth blade
- Always leave a 1/8-inch gap for expansion
- Seal edges with compatible caulk if needed
For outlets, consider installing exterior-rated covers before siding goes up.
How to Install Insulated Siding: Fastening and Expansion Guidelines
Improper fastening is the leading cause of siding failure. Understanding thermal movement is essential when you’re learning how to install insulated siding.
How to install insulated siding – How to install insulated siding menjadi aspek penting yang dibahas di sini.
Correct Nailing Technique
Insulated siding expands and contracts with temperature fluctuations. Nails must allow for this movement.
- Always nail in the center of the nailing slot
- Do not drive nails flush—leave a slight gap (about the thickness of a dime)
- Use corrosion-resistant nails or screws (typically provided by manufacturer)
- Fasten every 12–16 inches on center, aligned with studs
Over-driving nails can restrict movement, leading to buckling in hot weather or cracking in cold climates.
Managing Expansion in Long Wall Runs
Walls longer than 40 feet require expansion joints to prevent stress buildup.
- Install expansion inserts at intervals recommended by the manufacturer
- Use a siding removal tool to separate panels at the joint
- Slide the expansion joint into place and secure with fasteners
- Ensure panels can move freely within the joint
Ignoring expansion can result in wavy walls or popped fasteners—costly mistakes that undermine the entire project.
How to Install Insulated Siding: Final Touches and Inspection
The final phase of how to install insulated siding involves quality checks, sealing, and cleanup. This ensures durability and aesthetic perfection.
Inspect for Gaps, Gaps, and Fastener Issues
Walk around the house and examine every panel, joint, and trim piece.
- Check that all panels are securely locked together
- Verify no nails are over-driven or missed
- Look for gaps larger than 1/8 inch between panels
- Ensure J-channels and corner posts are plumb and secure
Use a flashlight at an angle to spot subtle misalignments or gaps.
Seal and Clean the Surface
Once satisfied with the installation, clean the siding with a mild detergent and water.
- Avoid pressure washers above 1,500 PSI to prevent damage
- Use a soft brush for stubborn dirt
- Apply caulk to any small gaps around trim or penetrations (use paintable acrylic or silicone)
Never caulk the weep holes at the bottom of panels—these allow moisture to escape and must remain open.
Common Mistakes to Avoid When Installing Insulated Siding
Even experienced DIYers make errors. Knowing what not to do is as important as knowing how to install insulated siding correctly.
Mistake 1: Ignoring Manufacturer Instructions
Every brand has specific requirements for nailing, spacing, and accessories. Deviating from these voids warranties and risks performance.
- Read the installation manual thoroughly before starting
- Follow fastener type and spacing guidelines exactly
- Use only approved trim and accessories
For example, CertainTeed and Mastic siding have different expansion tolerances—don’t assume one size fits all.
Mistake 2: Poor Flashing and Water Management
Water is the biggest threat to any wall system. Inadequate flashing leads to rot, mold, and insulation degradation.
- Never rely on siding alone to keep water out
- Always use a WRB and proper flashing at all penetrations
- Slope window sills outward to shed water
“The siding is the raincoat, but the housewrap is the umbrella. Both are essential.” — Building Envelope Consultant
Mistake 3: Incorrect Panel Alignment
Starting crooked or misaligning panels creates a wavy, unprofessional look.
How to install insulated siding – How to install insulated siding menjadi aspek penting yang dibahas di sini.
- Use a level and chalk line for the starter strip
- Check alignment after every few panels
- Use a siding alignment tool if available
If a panel is misaligned, remove it and reinstall—don’t try to force it into place.
Can insulated siding be installed over existing siding?
Yes, but only if the existing siding is in good condition and flat. Wood lap or aluminum siding can sometimes serve as a substrate, but always check local codes and manufacturer guidelines. In most cases, removing old siding allows for proper inspection and installation of a weather-resistive barrier.
Do I need a permit to install insulated siding?
Permit requirements vary by location. In many areas, siding replacement doesn’t require a permit unless it involves structural changes or is part of a larger renovation. Always check with your local building department before starting.
How long does insulated siding last?
Most insulated vinyl siding lasts 30–50 years with minimal maintenance. Fiber cement options can last 50+ years. Proper installation and climate conditions significantly impact lifespan.
Can I install insulated siding myself?
Yes, many homeowners successfully install insulated siding as a DIY project. However, multi-story homes or complex architectural features may require professional help. If you’re unsure, consult a certified installer.
Is insulated siding worth the extra cost?
Absolutely. While insulated siding costs 10–20% more than standard siding, the energy savings, increased durability, and improved comfort often justify the investment within 5–7 years, according to the U.S. Department of Energy.
Learning how to install insulated siding is a valuable skill that can transform your home’s efficiency and appearance. From preparation to final inspection, each step plays a crucial role in ensuring a durable, weathertight, and energy-efficient exterior. By following manufacturer guidelines, using proper tools, and avoiding common pitfalls, you can achieve professional results that last for decades. Whether you’re a seasoned DIYer or planning to hire a contractor, understanding this process empowers you to make informed decisions and protect your investment.
How to install insulated siding – How to install insulated siding menjadi aspek penting yang dibahas di sini.
Recommended for you 👇
Further Reading: